Menu


With our just plan it software we aim at helping small and mid-sized manufacturers (especially job shops, machine shops and small make-to-order shops) with an easy time and resource scheduling. Following the launch earlier this year, we have been spending more than 6 months discussing with customers and prospects, analyzing needs, observing the usage patterns of our customers and of those folks who tested the production scheduling software, sharpening the use cases and gaining the hell lot of new insights. Doing this, we always had the strong intent to further fine-tune our product and to make it even more useful and impactful for all the SMB manufacturers around.
As we are Germans, we tend to cite Johann Wolfgang von Goethe from time to time. Here is one that fits so nicely that I can't withstand the temptation: "Knowing is not enough; we must apply. Willing is not enough; we must do." -- Yes, folks: we applied and we did it. Indeed. The result is a truly empowered version of our just plan it software.
The purpose of this blog post is to provide you with an overview of all the great new features that will help you ease your time and resource scheduling. Before I start, here is a lesson learned: I never want to write such a long blog post again. Hence, from now on, we will publish enhanced versions of just plan it more regularly and in smaller steps. OK. Enough preface. Let's look at the real stuff.
So, here are all the new and enhanced functions which are available to all just plan it users from now on (and by the way, I recommend reading this post to its very bottom, because I reserve some of the true highlights for the end of this post).
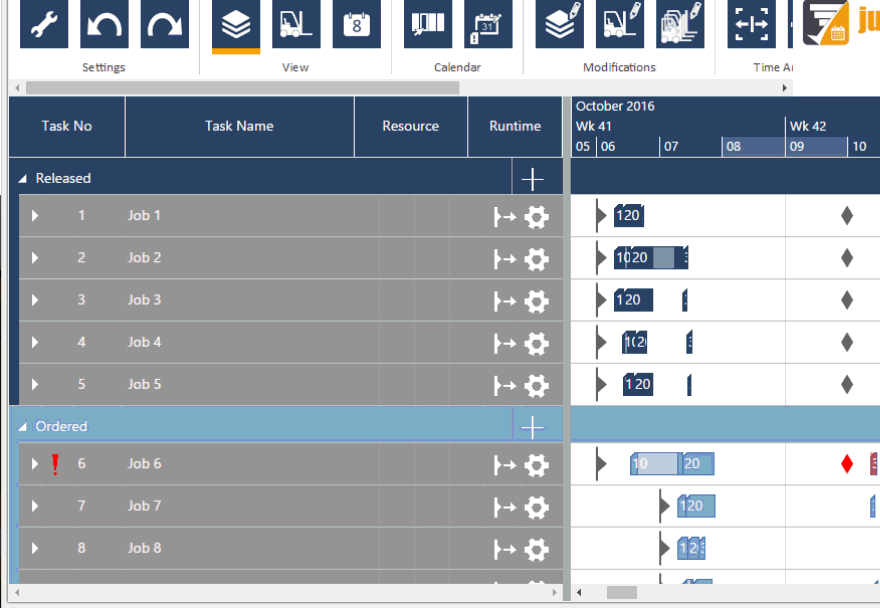
The hybrid scheduling mode (as announced in a blog post a few weeks ago) is an advanced production scheduling functionality, which is available in the ENTERPRISE package (btw: if you are unaware of our product packages, please visit our pricing page). As you might know, just plan it comes with a powerful scheduling engine made for SMB manufacturers (available for PRO and ENTERPRISE customers), which generates an efficient production schedule from your raw data - no matter whether they come from Excel, your ERP system or if you enter these data in the just plan it software. This scheduling engine takes into account priorities of your jobs, your routings (i.e. the sequence of the tasks), machine utilization, restriction dates, your shift calendars, your planning strategy and much more parameters. Whenever you add jobs, or change data like the priority of a job, the scheduling engine calculates and shows you the impact of these changes on the fly.
As slick as such an automation is, we have heard customers say: "You know, sometimes we have those jobs, where we do not want to rely on any automatism. We just want to make sure that they happen exactly when we want them to happen. We do not want to have them getting moved around by any 'scheduling engine'. If such a job needs to be moved, I want to do it by myself wih 100% control."
This is what the hybrid scheduling mode is all about: you can continue to enjoy all the benefits from working with an automatic scheduling engine. However, you now can combine this with the power of taking full control by manually overruling all of the engine's rules. Just mark individual jobs as "manual" by clicking on the gear-wheel in the job line and switching from the gear-wheel to the hand symbol. Now, you can manually plan this job and have it no longer moved around by the scheduling engine.

This applies to all our customers (BASIC, PRO and ENTERPRISE). We received a lot of questions about the three job statuses we have. We reworked them with the purpose of clarifying things:
By the way: using these statuses is not mandatory. It is just an option to facilitate your workflow from quote to cash. If you like it: use it. If you think this is clumsy: ignore it.
Again, this is for everybody (BASIC, PRO and ENTERPRISE). We continue to have the colors of the bars representing the above explained job statuses. In other words: one dedicated color for each status. However, we got the feedback that with the previous color scheme, we spent too much energy on making it look cool, rather than having distinguishable colors. We got you and changed this as follows.
This helps you easily spot the respective job status - even if you work in the Resource View:

We spent some efforts on making the respective date-related symbols more meaningful. Here is how all our clients benefit from this (BASIC, PRO, ENTERPRISE):
| Release date | |
| Due date (no issues, i.e. all tasks of the job finish before the due date) | |
| Due date (warning: at least one task of the job finishes past the due date) |
Here are two more symbols which you will work with as PRO or ENTERPRISE customer, when you use the scheduling engine and hence the automatic mode.
 |
The bracket on the left next to the bar (representing a task) tells you that there is a "start not earlier than" restriction for that specific task. This applies when your planning strategy for this specific job is ASAP. |
| |
The bracket on the right next to the bar (representing a task) tells you that there is a "do not finish later than" restriction for that specific task. This applies when your planning strategy for this specific job is JIT. |
One of the guiding principles for the new version was the phrase: "same result, but less mouse clicks". Hence, I can happily say that all our customers (BASIC, PRO and ENTERPRISE) benefit from us adding what we call action icons to the table in just plan it. You will find them in the table part of the visual schedule on each job line (Jobs View), on each resource line (Resource View) and on each group line (both Job and Resource View). Here is a brief overview of what they will do.
| Click this icon to copy a job. Yes, you are right. Just one click to copy a job - with all tasks, durations, settings, etc. This is new functionality. | |
| Delete a job. Again: with all details. Just click and say good-bye to the job. | |
| You can edit your job via this icon. Precisely, the pen brings you to the Job Detail dialogue, which will receive a bit more attention below. | |
| This icon indicates that you apply an ASAP strategy for this job. As it lives in the row of action icons, it is clickable. If you do so, you change the planning strategy to JIT. Hence, the icon will then look like the one explained next. Of course, this icon requires the scheduling engine. This is why it is only enabled for PRO and ENTERPRISE customers. The icon is white if the selected strategy is your default strategy. It turns yellow, if the strategy for this job is a deviation from your default. | |
| |
Likewise, this icon indicates that you apply a JIT strategy for this job and you can click it as well. With this, you change the planning strategy to ASAP. Hence, the icon will then look like the one explained above. Of course, this icon requires the scheduling engine. For sure, this only works for PRO and ENTERPRISE customers. The icon is white if the selected strategy is your default strategy. It turns yellow, if the strategy for this job is a deviation from your default. |
| The gear-wheel indicates that for this job the automatic scheduling mode applies. This is the default setting for all PRO customers. As an ENTERPRISE customer, you are eligible for the hybrid scheduling which I explained before. In that case you can click the gear-wheel and change to manual scheduling for this job. The icon is white, if the selected strategy is your default mode. It turns yellow, if the strategy for this job is a deviation from your default. | |
| |
The hand tells you that you work in the manual scheduling mode for this job. This is the default setting for all BASIC customers. As an ENTERPRISE customer, you are eligible for the hybrid scheduling which I explained before. In that case, you can click the hand and automatically schedule this job.The icon is white, if the selected strategy is your default mode. It turns yellow, if the strategy for this job is a deviation from your default. |
| The plus icon appears three times in the Jobs View - on all group lines (in the lines where it says "released", "ordered" and "quoted"). Click the plus to add a job into this specific group. This is new functionality and will be explained more detailed below. |
Of course, what goes for the Jobs View should go for the Resource View as well:
| With this icon, you can copy a resource into the same resource group - including all the inherent calendar settings. | |
| Again - one click and say good-bye to your resource, or to an entire resource group (if clicked on resource group level). | |
| From here, you can access the general calendar of this specific resource. This means: you can define the default work and non-work times for that resource. | |
| |
Simply add a new resource to the respective resource group. |
Sounds complicated, is fairly easy and simplifies the lifes of all our customers (BASIC, PRO and ENTERPRISE). Just click on the job name in the table of the visual schedule and two things happen automatically:
Sounds magic? Have a look:

We enhanced the possibilities to make just plan it fit to your needs by applying some general settings. Here is how the setup dialogue looks like for all customers (BASIC, PRO, ENTERPRISE), and below the screenshot you find some words about what has changed.
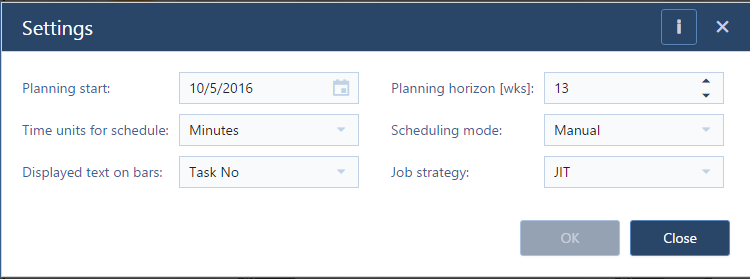
I am sure you already sensed that the sequence number plays a crucial role in our just plan it software. It determines a kind of a priority that you give to a job. The lower the sequence number, the higher the job's priority and the earlier this job gets the required resources. As changing the sequence number is something that users need to do rather frequently, we made it easier to open the respective dialogue: there is no right-click hazzle any more to change the sequence number. Instead, the sequence number is shown first in the table of the Job View (at the very left hand side to emphasize the importance). Second, this number is now also clickable to open the respective dialogue from there. Working with the sequence number requires the scheduling engine, and hence this function is only valid for PRO and ENTERPRISE customers.
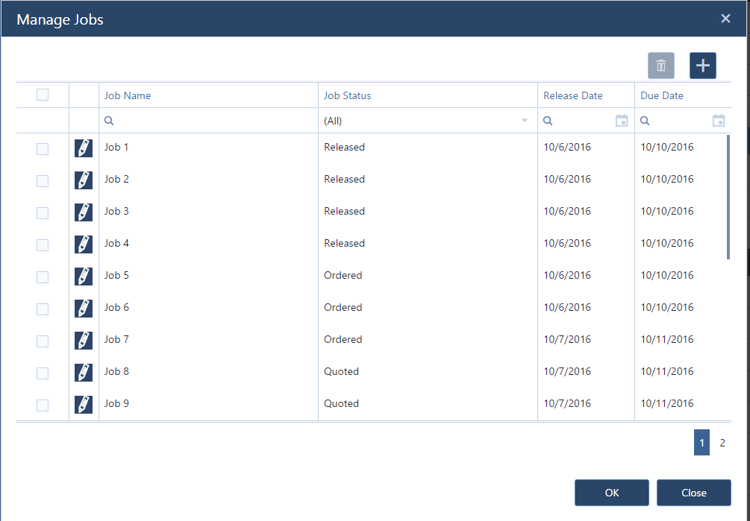
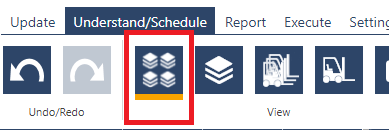
For all customers (BASIC, PRO and ENTERPRISE): See all jobs in one list - not in the Gantt chart, but as true list. Use this list to search for jobs, to filter jobs and from there to quickly edit jobs (by pressing the "edit" button (pen) next to the respective job). Also, mark a couple of jobs to bulk delete them.
You open the job list with pressing the following icon in the menu ribbon.![]()
Well, this is something our users do anytime and many times when they work with just plan it. Hence we scrutinized the entire process of adding and editing jobs and tasks and tried to streamline it as much as possible for all clients (BASIC, PRO, ENTERPRISE). Besides significantly reducing the number of clicks needed, we broke the old - somewhat clumsy - process into a couple of sub-processes which you now can access separately depending on what you want to achieve.
Editing jobs & tasks now breaks down into three parts:
If you want to edit multiple jobs at the same time (e.g. delete them, change their name, change their status, e.g.) you work with the Job List, which I just introduced above. By the way: good news is that you can do an "in-place editing" in this list. For example, if you want to change the name of "Job 1" to "Job 1234" you simply click the respective cell in the table and start typing. As soon as you press "OK", all these changes are reflected in the schedule.
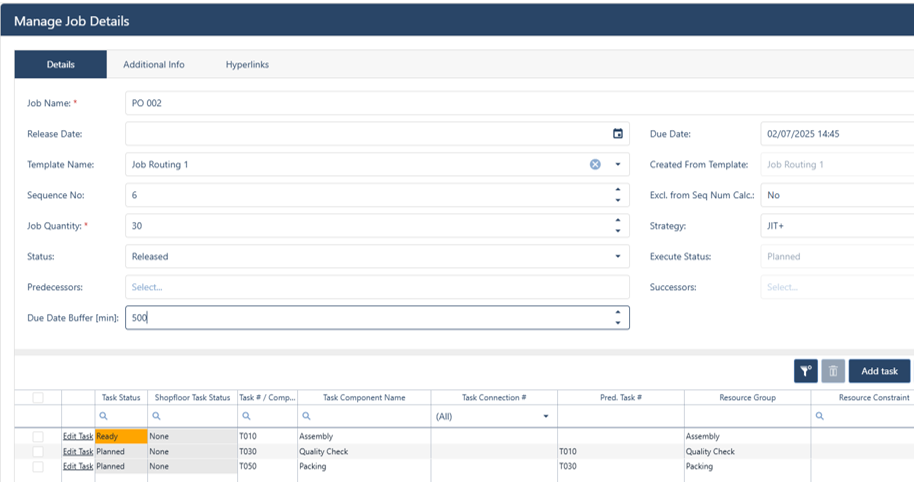
If you click the edit action icon (the little pen) either in the table of the visual schedule or in the job list, the Job Details dialogue opens. It lets you quickly edit all job details as well as the key information about all tasks belonging to this job.
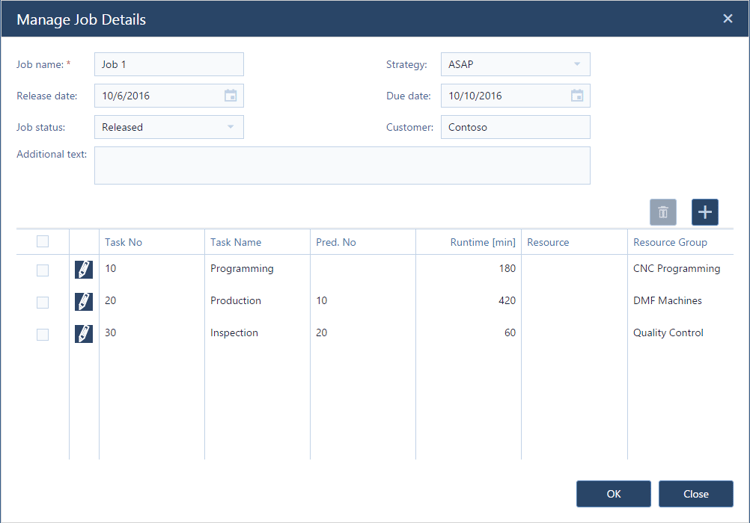
Again: just type into the fields and tables and confirm your changes by clicking "OK" to update the information in your schedule. There is also a minor change that we made, of which we feel that it has a great impact for you. Typically, when adding the tasks, folks start with task 1, then task 2 and so on. Means: in the order that you work on these tasks. In the past, you always had to specify a task's successor. This led to the inconvenient situation that you had to type in a task as successor which had not yet been created before. Worked, but did not work as smart as we hoped. We thought it would be about time for a change, and now you need to specify the predecessor of a task (which you already created before). To make it even more convenient, we introduced the task number, which you now can refer to when specifying the task's predecessor.
Did you notice the little edit pen next to the task numbers? They bring you to the Task Details dialogue. I bet that most of the time this is not needed. However, we want to give you the option to put in more information about your tasks:
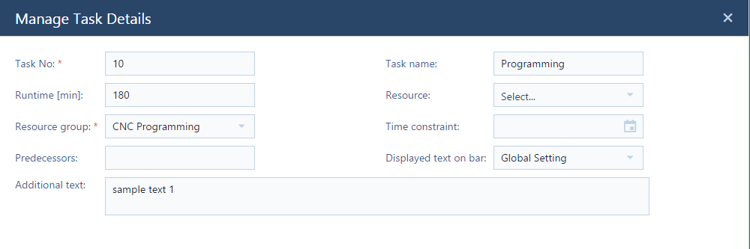
I am sure that most of the above speaks for itself. Nevertheless, I would also like to draw your attention to the tiny but shiny field "displayed text on bar". As I mentioned before (in the section about the settings dialogue), you can now define a text to be displayed on the bar. In the Task Details dialogue, we even take this a step further: Here you can specify a deviation from the global settings. For example, you generally show the job number on each task bar but you have one super important customer, you could use this functionality to show this customer's name on the bars of his jobs.
OK, enough words on how we eased editing jobs. Adding jobs becomes super simple as well. As I said earlier, just click on any of the "+" symbols in the Job View, and an empty "Job Details" dialogue opens (of course, prepopulated with the correct job status). Enter all job and task information here, click "OK" and a new job is added to your schedule.
Had a close look at the above screenshots? Saw something that you did not see before in just plan it? You name it! We added some new fields both on job and on task level. Here you go:
Of course, these fields are available for all customers (BASIC, PRO, ENTERPRISE).
I spent much time writing about the ease of use we brought to editing and adding jobs and tasks. Good news is: once we figured this out for jobs and tasks, we could easily transfer the principles to resources and resource groups. Here, you now have the following dialogues:
As it works exactly as with jobs and tasks, I save my writing and your reading time and avoid spending more details on this. It is just the same. Trust me. - Needless to say that is also for all clients (BASIC, PRO, ENTERPRISE).
As you might know, you can define exceptions from your standard resource calendar. If for instance you have a maintenance scheduled for one machine next week Tuesday from 9am to 11am, you easily can specify this exceptional non work time. The Calendar View helps you seeing these exception at a glance. What we did for all clients (BASIC, PRO, ENTERPRISE) is making the display of the calendar exceptions more crisp: we now highlight the day(s) with the exception and show the work and non-work times as you are used to see them.
This is one of the functions which had been requested most urgently by our customers and all folks who have been testing the software (on the list of the Top 10 requests, it made it on rank no. 3) and hence we built it for everybody (BASIC, PRO and ENTERPRISE). We sensed that most of you really appreciate the capability to upload your data via Excel into just plan it. What is new now is that you can also use the Excel template to add new jobs to your schedule - without impacting the existing schedule. This means that the newly added jobs always will get a higher sequence number than the ones that were already in the schedule. Consequently, you find them at the very bottom of your schedule.
To make use of this functionality, we kindly ask you to use the new Excel template from now on. You can download the Excel production scheduling template from here.
Folks, we did it (and we did it for anybody using BASIC, PRO and ENTERPRISE): We opened Pandora's box and made a first - small but meaningful - step into also generating reports on your just plan it data. This was at rank no. 2 of the above mentioned Top 10 requests. Currently, you can access the reporting capabilities via this button in your menu ribbon: ![]() . This then opens a new dialogue and you can choose between two basic reports:
. This then opens a new dialogue and you can choose between two basic reports:
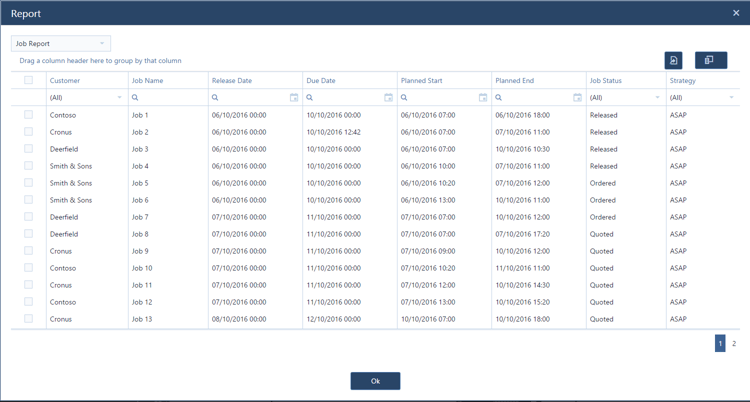
The Job Report provides you with a list of all the jobs with all their information. This includes the information you provided such as job name, customer, release date, due date as well as the information that was produced by the just plan it software such as planned start and planned end date. Here is how it may look like:
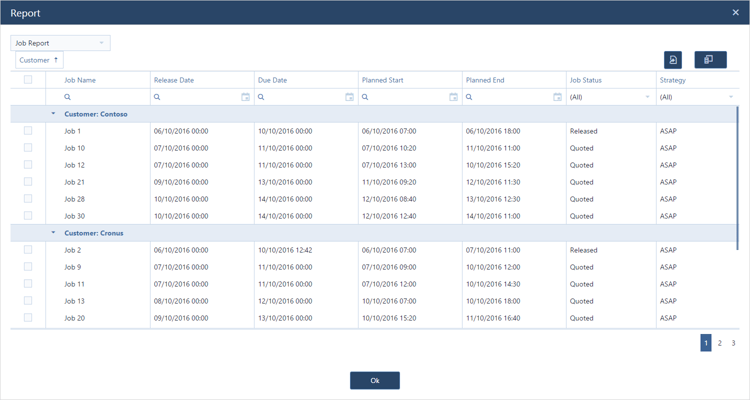
You can sort the report by any column (just click it), you can filter the report using any column, and you can add and remove columns via the button ![]() . Even cooler, you can also group the report by dragging any colum just above the table. This may then look as follows (grouped by customer):
. Even cooler, you can also group the report by dragging any colum just above the table. This may then look as follows (grouped by customer):
The Task Report is similar, but has a focus on the task (as the name suggests). When working with the Task Report, the above mentioned capability to sort and filter our reports can become quite meaningful. Here is why: you might want to sort by start date and filter by a certain resource. With this you get the task or todo list for this specific machine. Just print it and your machine operators will know what they have to do and when.
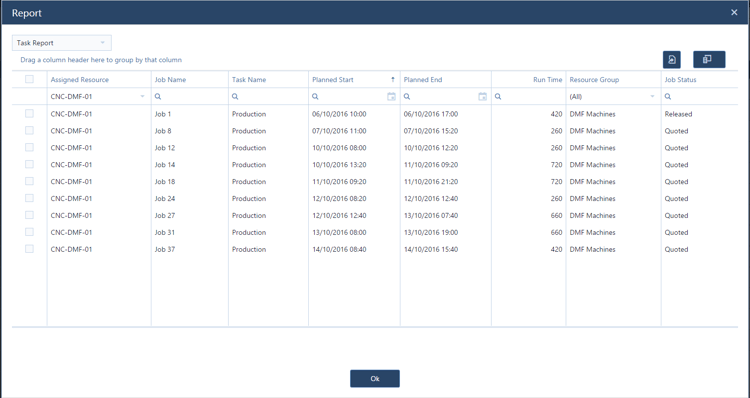
Of course, all functions like grouping, sorting and filtering mentioned for the Jobs Report work as well. Did I already shared with you that you can change the order of the columns via drag & drop?
We literally heard you saying when reading the section about the reports: "I like that; it's good. But would be great if we could export these reports into Excel." And we could not agree more: good is not good enough; our aim is building a truly great production scheduling software for small manufacturers. On both the reports dialogues, all customers (BASIC, PRO, ENTERPRISE) find a small button looking like this:
![]()
Try it out ... and you will get your just plan it data easily exported to Excel. I sense, it has never been easier before to generate machine-specific task lists ...
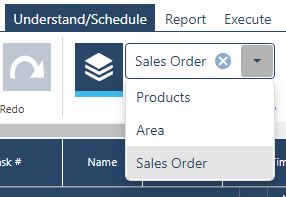
So, we are approaching the end of this blog post ... and I almost forgot mentioning that we also enhanced the filtering capabilities. You (using BASIC, PRO and ENTERPRISE) can now filter on:
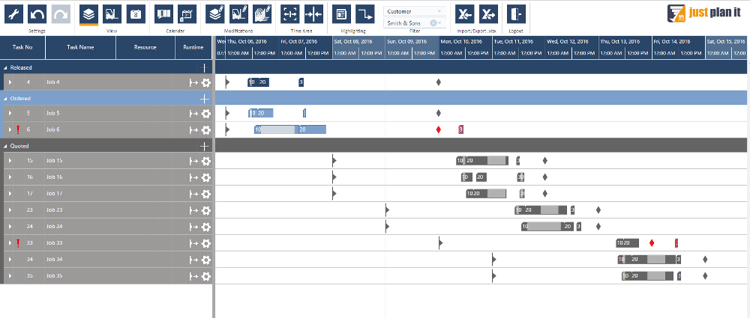
Here is my production schedule just for the customer Smith & Sons:
In the text above, I kind of silently introduced some new features as part of other features or alongside with the introduction of other new or enhanced functionality. Namely this is:
I am super excited about all these changes to our just plan it software, and I hope you are as well. If so, please do me a favor and share your excitement with us in the comments section at the very bottom of this page. I am sure that our developers (who did this amazing job for you) will read all these comments. And I promise that each comment will inspire them to put the same passion and enthusiasm into the next version.
Thanks for your interest in just plan it - and thanks for reading this long blog post,
Martin
PS: Not using just plan it so far? Looked at it in the past but was unsure if this product is the right fit? The time never had been better to give it a closer look, and to sign up for a free 30-days trial. Yes, it is free, without any obligation and you can use all features, have all your data saved and enjoy an easy time and resource scheduling.
just plan it is a production scheduling software plus scheduling tools & best practices to help high-mix low-volume make-to-order manufacturers gain transparency and control over their shop operations. The software plus its methodology is used by thousands of people around the globe. They consistently achieve improved on-time deliveries, shorter lead times, and better utilization of their resources.
As just plan it is not just software, but a lot of processes and best practices, we recommend that you start with an exploratory meeting. If we agree that there is a fit between your requirements and our approach, we'll build a prototype for you.
Hence, it all starts with a meeting. Book that meeting now.
No Comments Yet
Let us know what you think