Menu

.png)

We are excited to announce the release of the latest version of our production scheduling software just plan it (jpi in short), specifically designed for high-mix low-volume manufacturers. This new version incorporates a range of powerful features that will greatly enhance your ability to efficiently manage and organize your production schedule. Let's take a look at what's new and how it can benefit your manufacturing operations.
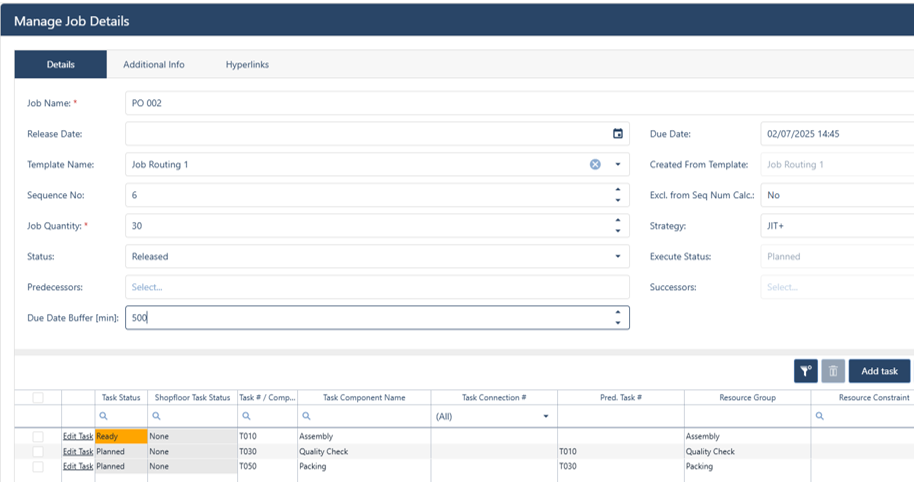
One of the most impactful decisions a planner makes when working with jpi, is to determine the priority for each job. The job sequence number is a core parameter for the automatic finite scheduling engine when assigning the operations to the requested resource(s). Before today, it was the planners' task to manually define the sequence number for each job. In this context, it was understandable to us that this manual task to get everything to where it belongs can be very time-consuming, especially with schedules with many jobs. Accordingly, we have repeatedly received suggestions from our customers to be able to assign the job sequence numbers automatically.
And now the time has finally come: with the current release, jpi offers the option of automatically assigning job sequence numbers based on customizable rules.
The idea of the automated calculation of job sequence numbers is to provide extended functionality in addition to the critical sequence number
Accordingly, the new functionality allows you to
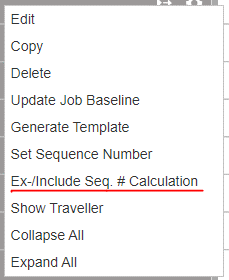
In this regard, the initial step of making use of the new functionality is to activate it. This can easily be done by defining the set-up of criteria for the automated job sequence number calculation. In the settings dialog, you will find a new tab” Job Seq. # Calculation”:

Here you can define the rules the engine will apply when processing an automated job sequence number calculation scheduling run. With setting one or multiple order lines the functionality is directly activated. Let’s run through a short explanation of the options you have:
When setting up your criteria you can combine as many of the above options as you would like. As an example, the order column in the picture above determines the general order of calculation of the job sequence numbers. So, in the first iteration, the “Field” with “Order” 1 is taken into consideration, then, if there are jobs with the same values after iteration one, the second “Order” becomes effective for the second iteration, and so on.
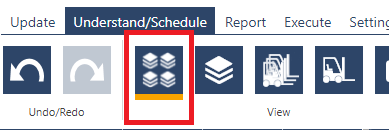
To trigger the automated calculation of job sequence numbers, you will find a new button in the “Update” tab in the “Schedule” section (see the icon at the very right below):

Please note:
If you generally want to use the automatic sequence number assignment but would like to exclude some special jobs from the algorithm, then we also offer the corresponding option.
When excluding a job from the automatic assignment, it will be pinned to its current sequence number. This means for example a job pinned to sequence number 5 will keep that even after using the automatic sequence number assignment. This does NOT mean that the job is guaranteed to be scheduled to the same time slots, as due to the new sequence number assignments of other jobs than plan could have shifted.
You can in/exclude specific jobs from the automated calculation in a couple of ways:

You can see which jobs are excluded at a glance in the job view by looking at the sequence number:
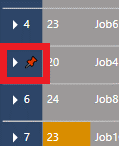
Excluded jobs will have this pin symbol to notify that they will be kept at this sequence number regardless of changes around them via the automatic sequence calculation.
As part of the development and testing of the new functionality, we took a lot of time to derive instructions for the best possible use. As usual in HMLV scheduling, there is no one golden rule here, but each use case must be considered individually and carefully. But we can still give guidelines for two typical cases.
We will go into more detail and tips and tricks on how to best use this in the upcoming webinar as well as future blog posts. As the usage of this mighty functionality provides the potential to achieve great benefits, we highly recommend you make intensive use of all the resources we provide.
We presented the new functions in a webinar on January 23, 2024. Watch the recording here.
Most of our users have production orders coming in weekly if not daily, some of which are very important short-term orders, and others have due dates many months in the future. Until today, jpi handled both cases exactly the same. We schedule the jobs in accordance with the rest of your schedule and show both to your planner with the same level of detail.
For just a few orders, that might be fine. But if we scale this up, we overload the planner with a lot of job information that is simply not important RIGHT NOW. To help keep a better focus we are introducing a new feature to jpi we call the “Visualization Horizon”.
While all jobs are still going to be fully planned, we will only add bars to your planning board for tasks that fall into your visualization horizon. This means that while you have your schedule calculated for the next 52 weeks, you can have your planner focus on solving important scheduling challenges happening in the next 4 weeks.
All reports and dialogs will of course still contain ALL information in your schedule, but the graphical interface will simply just show you your immediate workload. As the performance of each software with a graphical interface is also determined by “painting” what needs to be shown, you will improve the performance of your jpi account the more you reduce your visualization horizon.
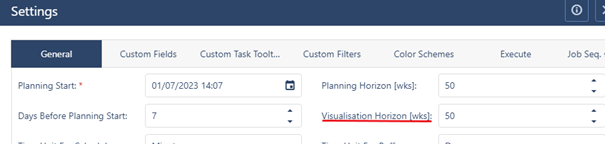
You can define the "Visualization Horizon" in the “General Settings” dialog, independently from the planning horizon, with its minimum being 1 week and the maximum visualization horizon equalling the planning horizon.
In case a job or parts of a job fall out of the visualization horizon, just plan it

In summary, we recommend thinking about what time window requires your immediate focus in terms of the Gantt chart views of the main client! Focus on gaining performance wins!
But this functionality is not only available for the main client. You can also reduce the focus of the tablet client (and the operator client) accordingly. Here just switch to the tab “Execution” in the settings dialogue and adjust the "Operations Horizon" accordingly.
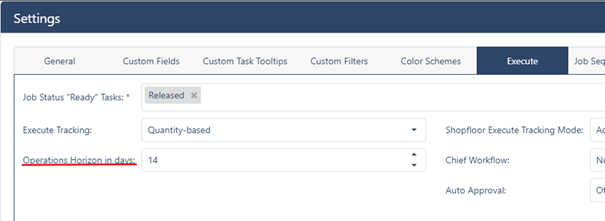
Please Note: the setting for the Execute Mode is in days not weeks.
We are convinced that reducing the horizon here certainly makes sense in pretty much all cases. Experience shows that the workers on the shop floor have a much shorter horizon. Here it is certainly enough to show the work list for the next (maximum two to three) weeks.
In addition to the above-mentioned features, we added a couple of minor enhancements to jpi with this release:
Finally: this release also includes a lot of bugfixes and smaller performance changes, as well as major internal changes that are setting us up for even more improvements in the future!
That’s it for today. We hope you all had a nice holiday time and are excited to get started with more improvements to come to JPI in the new year! If you have ideas for future enhancements that would help you schedule even better with JPI let us know!
As always, we are happy and eager to receive any feedback from you guys and to answer any questions you may have.
Until then,
Happy Scheduling!
Information on all previous releases you will find on our Product Release page.
Watch the recorded webinar with a live presentation of the new features.
just plan it is a production scheduling software plus scheduling tools & best practices to help high-mix low-volume make-to-order manufacturers gain transparency and control over their shop operations. The software plus its methodology is used by thousands of people around the globe. They consistently achieve improved on-time deliveries, shorter lead times, and better utilization of their resources.
As just plan it is not just software, but a lot of processes and best practices, we recommend that you start with an exploratory meeting. If we agree that there is a fit between your requirements and our approach, we'll build a prototype for you.
Hence, it all starts with a meeting. Book that meeting now.

No Comments Yet
Let us know what you think