Menu


Welcome back and a good start to the new year to all of you. We ended the last year with a major release that provided several great new scheduling benefits for high mix low volume manufacturers. But we used this sprint also for a huge overhaul in the backend that will allow us to make even more exciting enhancements to just plan it in the current year. Those changes start today, with the January release of just plan it:
Release dates are well known to our users as we provide it since the very first version of just plan it. In its original use case, they mark the “earliest possible start date” of a job in a technical sense, e.g. due to a delivery date of the material.
But release dates should not be used for this use case only. In a lot of cases, it is also reasonable to define due dates in an “earliest wanted start date” sense. What does mean? Well, the vast majority of our customers use the job strategy “ASAP”. So from the planning start line the just plan it scheduling engine automatically calculates the workload forward into the future. This grants the maximum buffer per operation. This is very beneficial to tackle the high uncertainty of the estimated input data on one hand. On the other hand, it can lead to very high throughput times and a not satisfactory WIP as tasks that are at the beginning of the routing or preceding a bottleneck are scheduled to start (too) early. In such a case you should use the release date to “force” the scheduling engine to schedule later start dates to get a better WIP.
Manually adding release dates to each job in an “earliest wanted start date” sense can be pretty time-consuming. To get a solid starting point here, we now offer the option to get release dates that are automatically calculated for all new jobs.
To activate this, you need to open the General Settings dialog:
As you can see, when activating the “Auto Release Date” you additionally have to define the “Buffer Factor”. The buffer factor determines how many buffer minutes/hours are added to the sum of production times of a job to calculate the auto-release date. The more buffer factor you set the earlier the calculated release date will be and vice versa. It is hard to give a “golden rule” here. But it makes sense to - at least - consider your standard working times pattern in relation to a 24/7 availability:
Please also note:
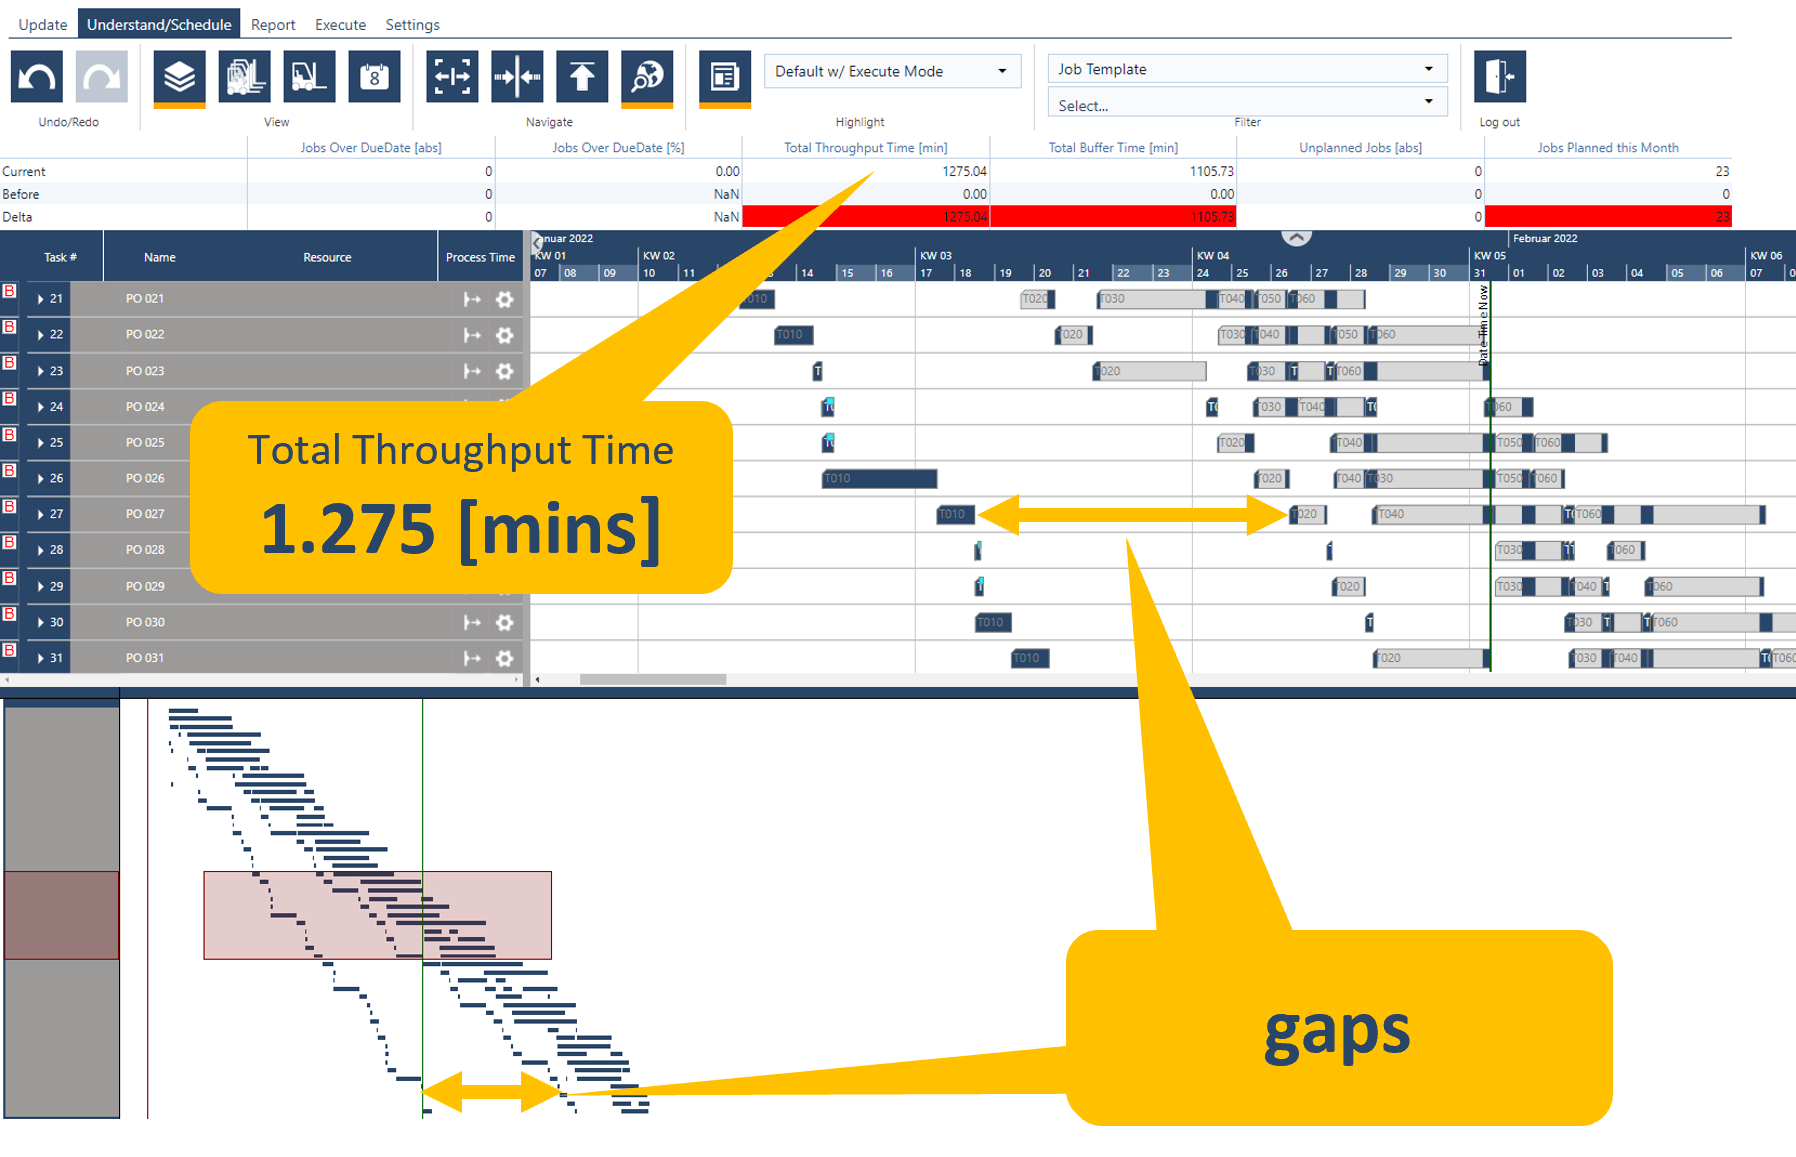
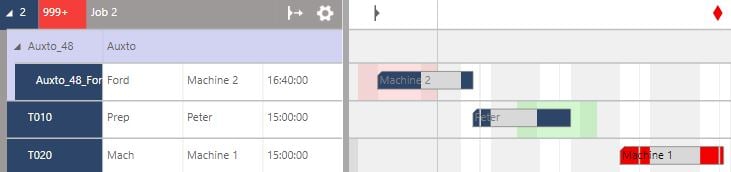
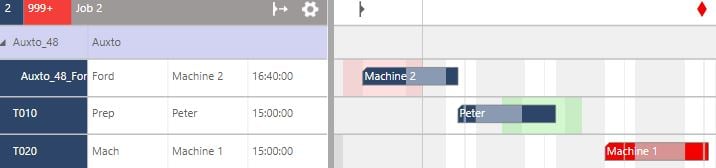
Let´s have a look at the auto-release dates in action. The picture below shows the world view of a jpi account with 50 jobs without any release dates. It is obvious that operations that are prior to the current bottleneck within the routing structure are scheduled (too) early as the gaps increase with the sequence number of the jobs. The KPI for total throughput time shows a 1.275mins level here.
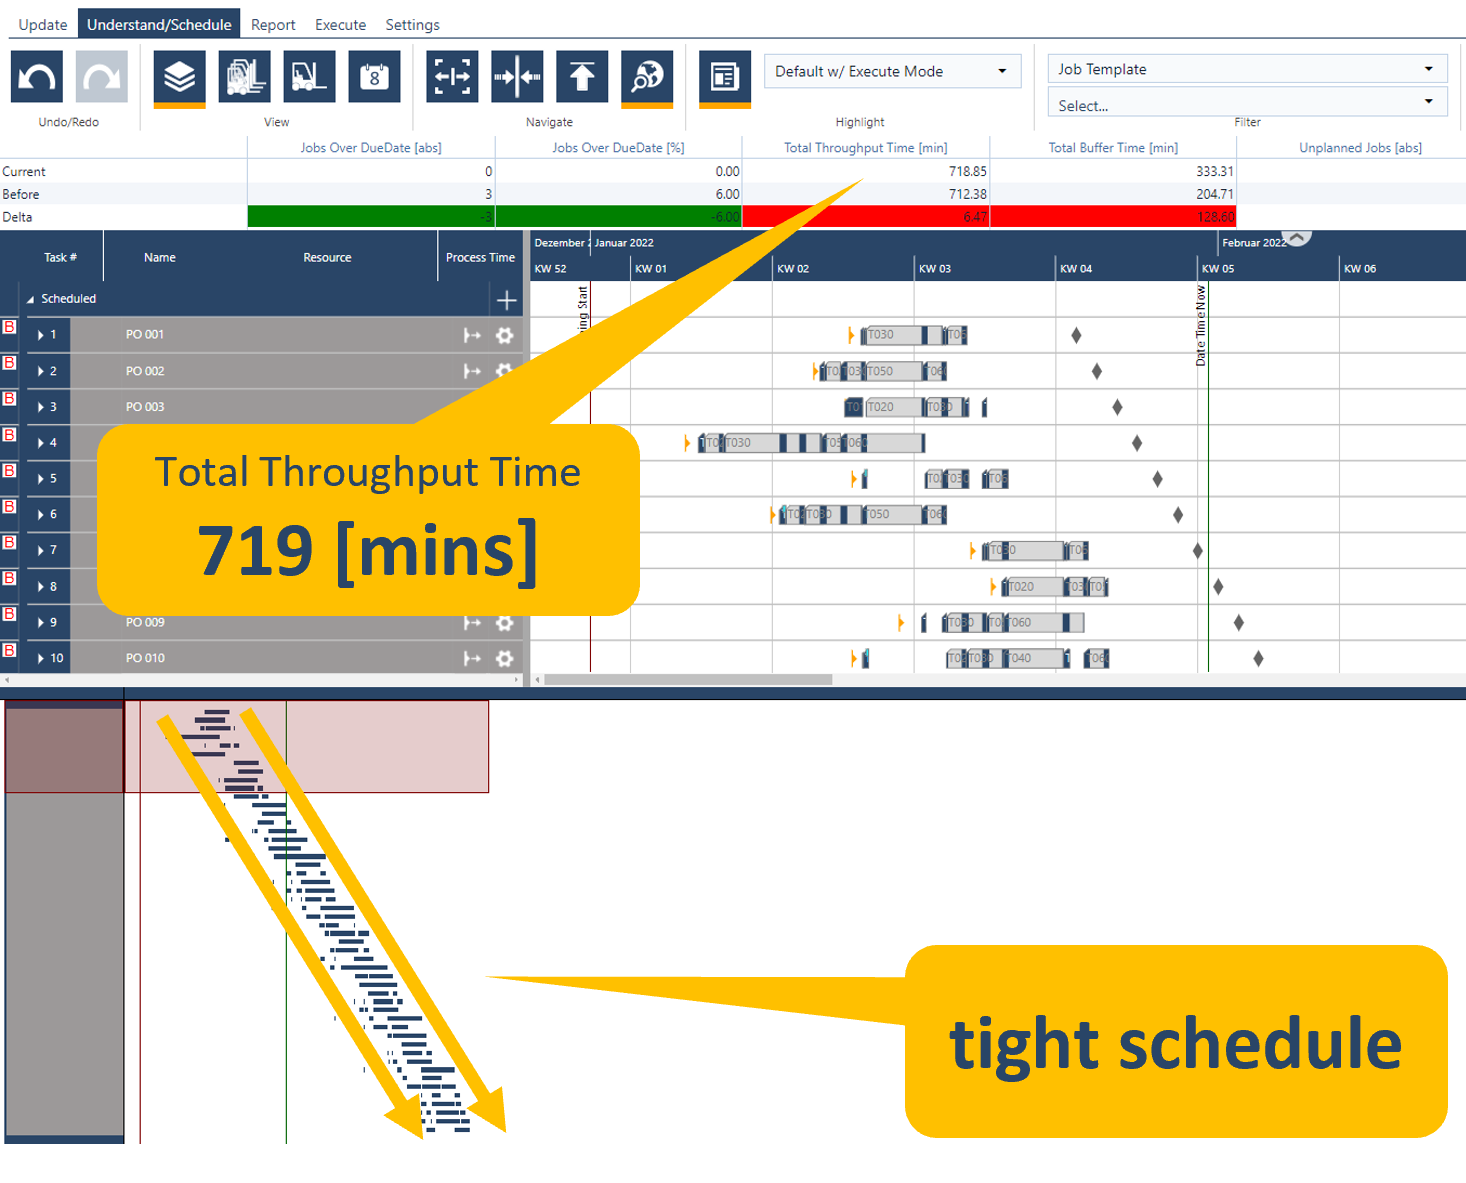
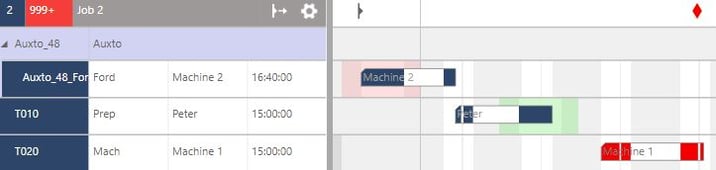
The following picture now shows the same account with auto-release dates activated. As the employees have an 8 hours weekday work pattern the buffer rate was set to “8”. The worldview shows the pretty tight structure of the schedule from “top left to bottom right”. This is particularly emphasized by the KPI that now has a total throughput time of 719mins, which is a 44% improvement of WIP compared to the scenario without release dates.
So, the auto-release dates can help you to improve the quality of your schedule in terms of WIP. In this regard, the functionality should be seen as a solid, automated starting value for a release date in an earliest wanted start date sense. I recommend to
>>Watch the recorded webinar from Feb 9, 2022, when we presented the new features live.
In general, we got some really great feedback from our December release. But there were also some notifications that the coloration of bars in non-productive time windows is preferred in the “old way”. And as always as we take your feedback as the basis to design the software we decided to enlargen the options of how a bar in the Gantt chart views is colored. And here you go: with the new version we provide the functionality to customize the way of coloration of bars. So you can choose the coloration that you prefer most out of five options. This customization can be easily done via the General Settings:
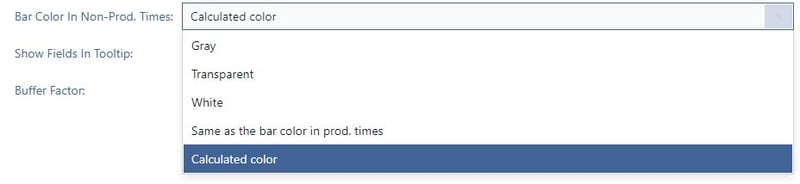
The first option is ‘Gray’ which is our current default color. Here the parts of a task that fall into non-productive times are colored in the same gray color as the standard non-productive times:
The second one is ‘Transparent’, which will allow you to see what's behind your bar in the non-productive times, i.e. the calendar exception causing it:

The option ‘White’ changes the whole thing to ... well... white:
The option ‘Same as the color in prod. times’ means the non-productive time intervals of a task will have the same color as the bar in productive time intervals:
The last option is ‘Calculated’, which gives a calculated color based on the productive time coloration. This was the way how bars were colored in the past before the last December release:
You might have also noticed some slight variations in the text colors. These will be automatically calculated based on both the productive and non-productive times, to make the text as readable as possible.
With this release, we also took major steps in the back end. These changes include a more differentiated look at incoming data. We now determine if the change would impact the schedule in a meaningful way, such as changing the production time per unit of a task or adding new jobs, or if it only updates informational data, like names or shopfloor feedback. (Shopfloor feedback impacts the schedule only after approval). In the latter case, we now can handle the update much quicker, which should result in improved performance for your operators and any not scheduling relevant updates of your schedule. This new implementation also opens up new ways for us to enhance our processes even more in the future.
That’s it for today. We started preparing some great things for the coming year and are excitedly looking forward to sharing them with you.
As always we are happy and eager to receive any feedback from you guys and to answer any questions you may have.
Until then,
Happy Scheduling!
just plan it is a production scheduling software plus scheduling tools & best practices to help high-mix low-volume make-to-order manufacturers gain transparency and control over their shop operations. The software plus its methodology is used by thousands of people around the globe. They consistently achieve improved on-time deliveries, shorter lead times, and better utilization of their resources.
As just plan it is not just software, but a lot of processes and best practices, we recommend that you start with an exploratory meeting. If we agree that there is a fit between your requirements and our approach, we'll build a prototype for you.
Hence, it all starts with a meeting. Book that meeting now.

No Comments Yet
Let us know what you think